This is a tutorial on how to program a maze navigation game in Scratch.
General Objective
Preparation time for facilitator
Competence area
Time needed to complete activity (for learner)
Name of author
Support material needed for training
Resource originally created in
Introduction
The goal of this tutorial is to illustrate and program a labyrinth. To beat a level, a player will need to collect a key, which will allow the door to be opened to the next level. This will have to done while avoiding an enemy trying to prevent the player from opening the door.
Drawing the map
First we will design different levels for our labyrinth. On the bottom right of the creation screen, hover over the backdrop tool and then click ‘Paint’.

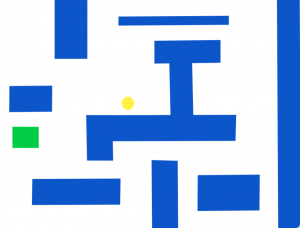
Choose one colour and draw a maze by using the ‘Rectangle’ tool (which will be walls/obstacles). For example:

Add a square of another colour to represent the door to the next level:

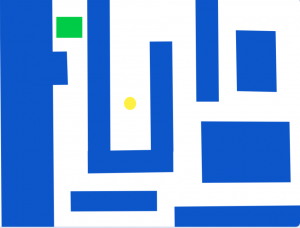
The first level’s done! Repeat the previous steps, creating a new backdrop, to make the next level. Rename the first level ‘Level 1’ and the second ‘Level 2’. Example:

Keep in mind that the starting point needs to be the same for every level. We will stop at two levels for the tutorial. You can create more later if you wish.
Adding a sprite
We will now create a sprite that we can move around the maze. For this, hover over the sprite icon on near the bottom on the right of the screen and click on the paint tool. Draw your own sprite. Make sure it’s small enough to pass through all the gaps!
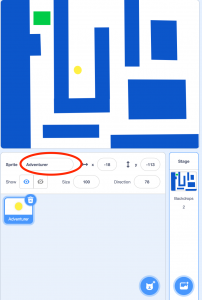
In this example. the sprite is a yellow circle. Change its name to ‘Adventurer’ by clicking on the field we have circled in the above image. We now need to make sure that the circle appears where we want it to at the beginning of the game and not on a wall. Add the blocks ‘when the green flag is clicked’ and ‘go to’ to the sprite’s script. Enter the desired values for X and Y in order that the sprite does not start on a wall for either of the levels. To know what values to use, click at the starting point you want. The coordinates will show up in the sprite details area. In other example, we have chosen x= -18 and y= -113.
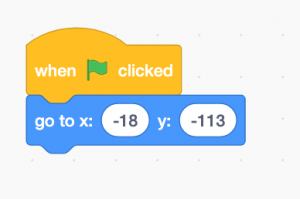
Which results in the following:
Controlling the sprite
We will now animate the sprite so it can be moved using the direction arrows. Add the following to the sprite’s script:
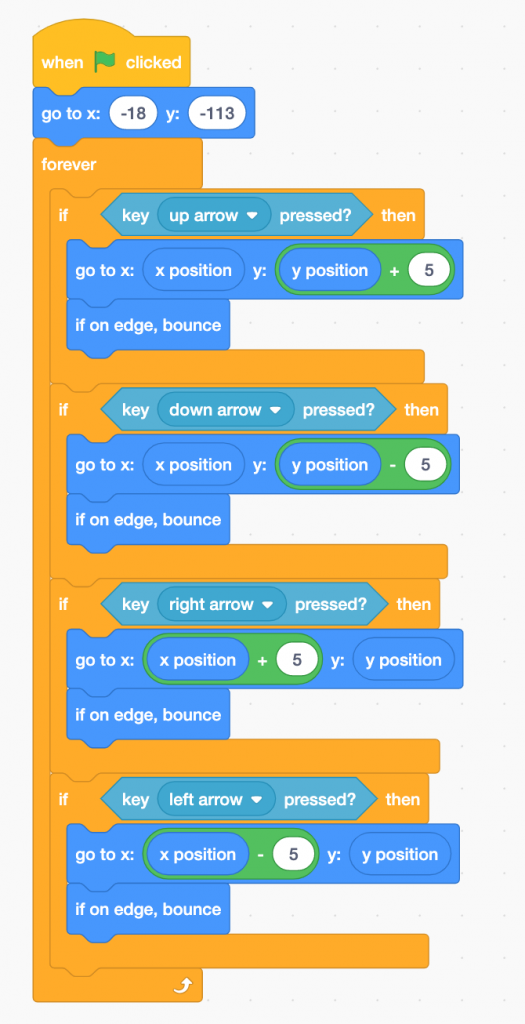
Code explanation: when the green flag is clicked, the sprite will appear at the designated coordinates. The program will then verify constantly if one of the arrow keys is pressed. If the up arrow is pressed, the sprite stays at its position on the x axis and moves +5 on the y axis. If the down arrow is pressed, the sprite stays at its position on the x axis and moves -5 on the y axis. If the right arrow is pressed, the sprite stays at its position on the y axis and moves +5 on the x axis. If the left arrow is pressed, the sprite stays at its position on the y axis and moves -5 on the y axis. In any case, if the sprite touches the edge, it bounces back. Click on the green flag to test the code.
Colliding with the walls
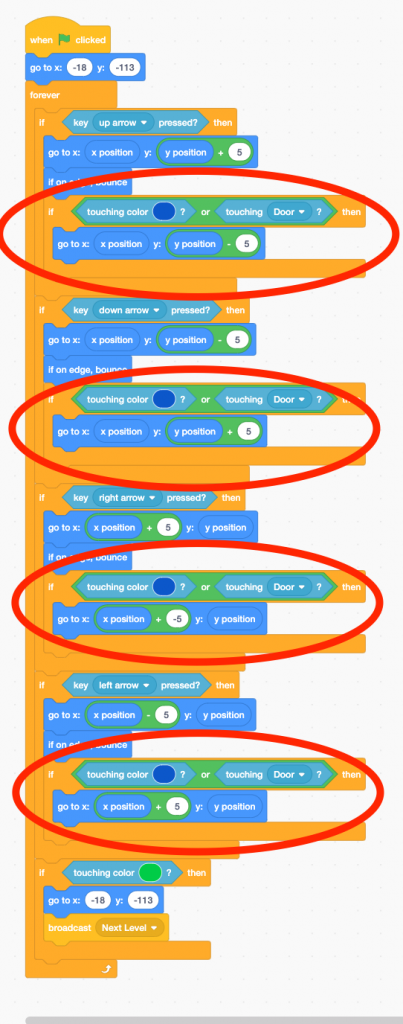
The sprite can now move, but we can see it crosses the walls, which shouldn’t happen. We will now add a condition which will mean that if a wall is touched, the sprite returns to its previous position. Here are the blocks to be added to the up arrow: 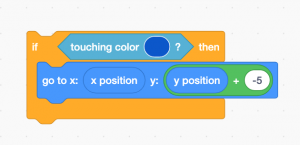
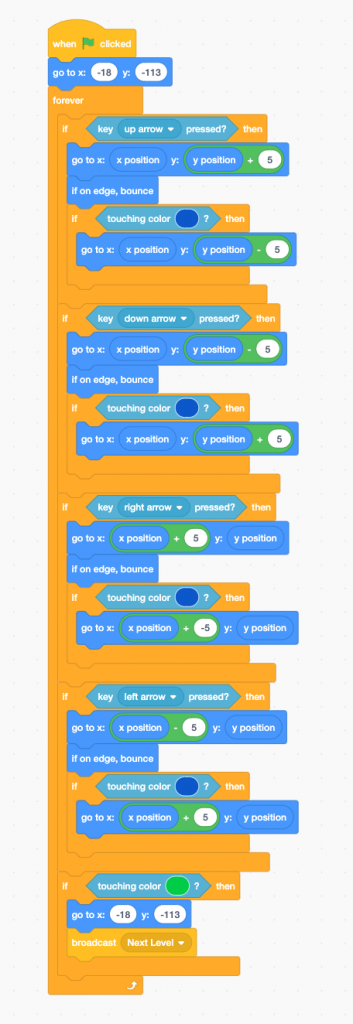
Code explanation: if the sprite touches the colour chosen to designate the labyrinth (here blue), it keeps its position on the x axis and moves -5 on the y axis. This gives the effect that its movement stops when we move into a wall from below. We have therefore created the illusion that it has been blocked by the wall. Add the same blocks for the other arrows while adjusting the x and y values so each time the required movement reversal takes place. The result should be as follows:
![]()
Changing levels
We now need to program level changes. First, the finishing of the present level needs to be detectable. Add the blocks below at the end of the program to detect when the sprite has touched the colour fo the exit (here green), return the sprite to its initial position, and send a message ‘next level’ message. To create the message, click on the dropdown menu arrow then on ‘broadcast’. This message will be sent to all game elements. We will use it later. They should look like this:
Go to the backdrop’s script and write the following the code the changing of levels: 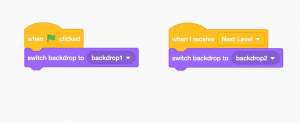
Code explanation: when the green flag is clicked, the backdrop shows the first level. When it receives the message ‘Next level’, the backdrop changes to the second level (taken from the list of costumes, so the next level needs to be second in that list).
Adding a key, door and enemy
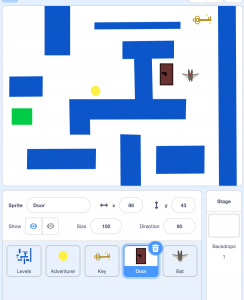
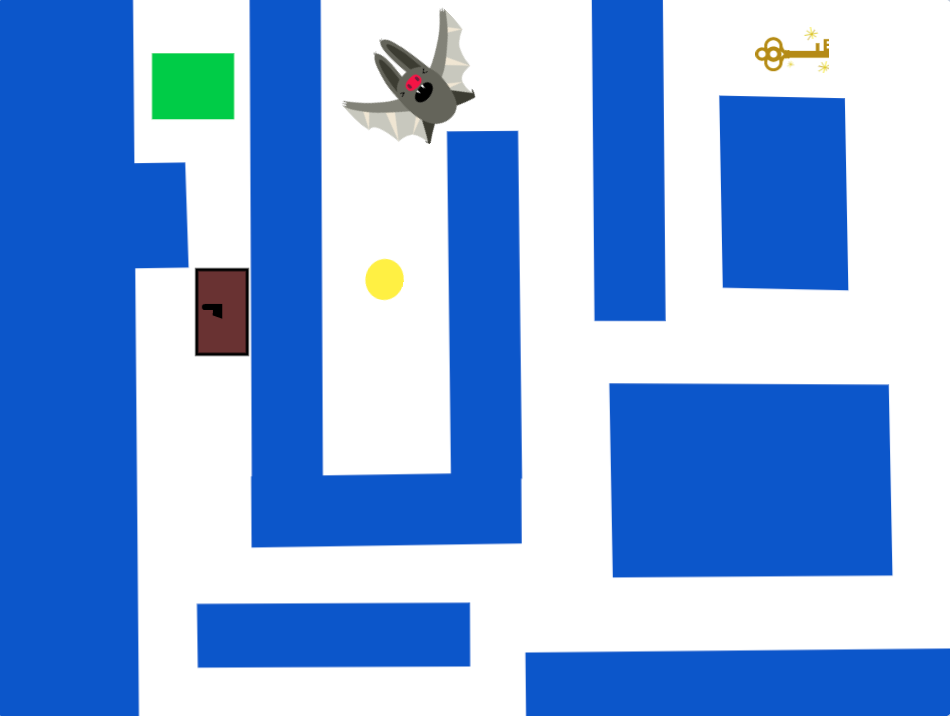
The game now works but lacks interest. In order to improve what already exists, we will add a door which will open using a key and will give access to level 2, as well as an enemy in the form of a bat. The second level will look like this:
Add 3 sprites and give the name and the appearance of a key, a door, and a bat respectively. You can draw them, choose them from the Scratch library or import them from your hard drive. We want the key to appear only in level 2. Add to the following blocks to the key’s script:
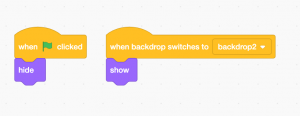
Code explanation: when the game starts (i.e. when the green flag is clicked, the key hides itself. When the next level appears (i.e. when the backdrop changes), the key appears. Next, we will make it so that when the adventurer touches the key, it disappears and sends a message to the door to tell it to open. Create the message ‘Open Door’. The script will therefore be as follows:
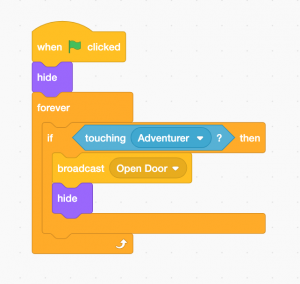
Code explanation: when the green flag is clicked the sprite disappears. The program then checks constantly whether the ‘Key’ is touching ‘Adventurer’. If this condition is verified, the message ‘Open Door’ is sent to all elements, and ‘Key’ disappears. We have therefore creating the illusion that key has been collected by the adventurer.
Animating the door
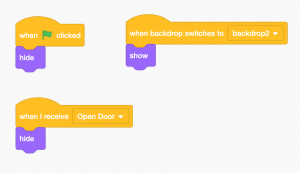
The door must only appear in the second level and must only open when the adventurer collects the key. Go to the door’s script. Add the same blocks as you did for the key, in order to hide the sprite when the game starts and show it when the second level starts. Next, add blocks to hide the door when the message ‘Open Door’ is received:
Unless the key is collected, the door should prevent the adventurer from passing. For this we will have to manage the collision using a sensor in the adventurer’s script. Replace all the ‘if touching color’ blocks with ‘if touching color or if touching Door’ blocks, as follows:
Now, each time the adventurer touches the door, its movement will be cancelled, as with the walls, without us having to redo the whole code. Here is an example of how the door can be placed as an obstacle:
Animating the enemy
The bat must move around the labyrinth and try to bite the adventurer. It should only appear in the second level. Add the following to the bat’s script: 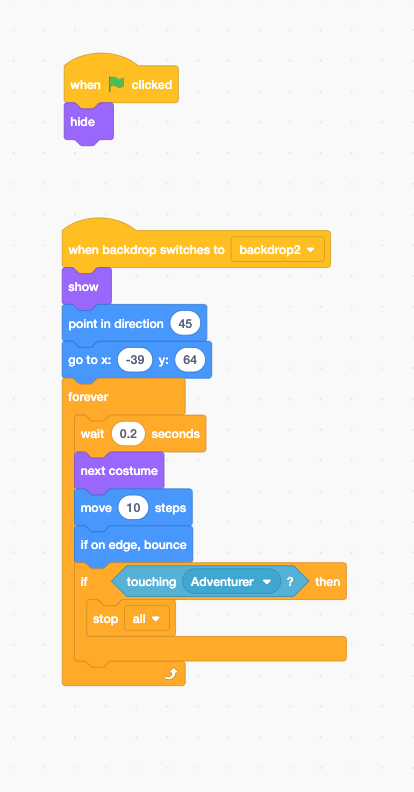
Code explanation: when the green flag is clicked, the bat will disappear. When the backdrop changes to ‘backdrop2’, the bat appears, sets its orientation and position according to those programmed, waits 0.2 seconds, changes its costume (giving the illusion it’s flying), and moves all over the stage, rebounding if it touches the edge. If it touches the adventurer, the game stops. These actions repeat indefinitely. The instruction ‘next costume’ uses the default next costume that is included with the bat sprite. You can switch these around by going to the ‘Costumes’ tab while the bat sprite is selected. Note: adjust the positioning, orientation and number of movement steps according to your liking.
Bonus
Some ideas to improve the game:
- Add more enemies
- Create more enemies
- Create potions that will shrink the protagonist so they can pass by areas it couldn’t access previously
- Create doors of different colour that react to keys of the corresponding colour
- Add sound effects that play with different elements (door opening, defeat, changing level…)
Activity variant:
- Draw levels on paper, then scan them and use them as backdrops.
Annex: Scratch coordinates
The x and y numbers that you see in the animation zone are coordinates. This area is a grid of 480 pixels wide by 360 pixels high. 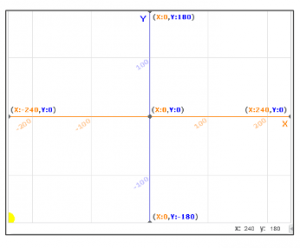 The centre is at (0,0). For x, the more to the left we move, the smaller and more negative the numbers become. If we go below -240, we leave the animation area. If we go to the right, the numbers get larger. If we pass 240 we leave the screen. For y, the further down we go, the smaller and more negative the numbers become. If we pass -180, the object leaves the screen. If we go up, the numbers get larger. If we pass 180, we leave the screen.